

 Back
 Русский
 Английский
Nov 5, 2026
What bitrate should you use in OBS? Twitch and YouTube
You've arranged your OBS scenes, added your camera and balanced the microphone. Everything looks good in the preview: the game runs smoothly, your face is clear and the text is easy to read. Then you open the broadcast on your phone. The picture holds up while you're talking, but a quick camera turn turns the grass and trees into a blur. Someone in chat mentions that the stream keeps freezing, too.
You open the bitrate settings and start looking for advice. One guide says to use 6,000, another creator streams at a much higher number, and someone else suggests giving up on Full HD. It would be nice to copy one setting and get on with the show. The trouble is that those people may be using different platforms, connections and content. A quiet conversation and a fast racing game ask different things of a stream.
You don't need to experiment with every field in OBS to find a sensible starting point. We'll look at what affects the picture, choose settings for Twitch or YouTube, and try them in a short broadcast. Along the way, you'll see when more bitrate helps, when a lower resolution makes sense, and when to look at your connection or computer instead.
What bitrate actually changes
Bitrate is the amount of data sent each second. With more data available to describe the picture, an encoder can preserve more detail, all else being equal. OBS normally expresses video bitrate in kbps: 6,000 kbps equals 6 Mbps. Audio travels alongside the video and uses some upload capacity of its own.
Picture two broadcasts: a conversation in front of a stationary camera and a racing game in heavy rain. In the race, the picture keeps changing — road markings, spray and small details rush past. The encoder has to describe all that movement within the bitrate you've given it. When there isn't enough data to go around, fine details disappear. Grass, water and foliage are often where you notice it first.
Resolution and frame rate add to the workload. A 1080p frame contains more detail than a 720p frame, and 60 fps means processing twice as many frames each second as 30 fps. Full HD at a high frame rate therefore asks more of your computer and your video stream. There is no simple rule that doubling the frame rate always means doubling the bitrate; the scene itself still matters.
The codec, or method of video compression, matters too. H.264, HEVC and AV1 handle the same picture differently. Before choosing a newer option, check that your destination and any service between OBS and the platform can accept it.
For an OBS connection to StreamVi, start with H.264, as shown in the StreamVi setup guide (in Russian). x264 is the software option and runs on your CPU. Hardware H.264 encoders such as NVENC, AMD and Quick Sync use the relevant block on a supported graphics device. Choose an option your computer offers, then test it with your game and OBS scenes running together.
Check upload capacity before choosing a number
Before raising the bitrate, find out whether your internet connection can carry it. Broadband plans tend to put a large download number front and centre. A live broadcast sends video out, so the number to look for in a speed test is upload speed.
Suppose you choose 6,000 kbps for video and 128 kbps for audio. Together, that's 6,000 + 128 = 6,128 kbps, or 6.128 Mbps, before protocol overhead. If your upload barely sustains that much, the stream has little breathing room. A file upload or cloud backup will have to compete for the same capacity.
If you usually stream in the evening, check the connection in the evening. Use Ethernet where possible, pause large cloud uploads and watch how consistently the connection performs. The best result from a speed test tells you less than a connection that stays steady throughout a broadcast. That's why the next step is a test stream to your chosen ingest server, which we'll cover below.
Leave some upload capacity free for fluctuations and your household's usual traffic. How much you need depends on the connection: some stay steady, while others slow down noticeably at busy times. If dropped frames keep returning, try a lower bitrate. Reducing the resolution or frame rate alongside it can help keep the picture clear within that smaller budget.
Starting settings for Twitch and YouTube
Once you have a feel for your upload capacity, you can choose settings for the platform. Twitch and YouTube recommend different values, so each has its own table below. The figures show video bitrate only, excluding audio, for a standard horizontal SDR broadcast without HDR.
Twitch: a single H.264 stream
| What you're streaming | Resolution and frame rate | Video bitrate | Source |
|---|---|---|---|
| Talking or slower gameplay on a limited upload | 1280 × 720, 30 fps | 3,000 kbps | Twitch Broadcasting Guidelines |
| Fast gameplay with motion as the priority | 1280 × 720, 60 fps | 4,500 kbps | Twitch |
| More detail when high frame rate matters less | 1920 × 1080, 30 fps | 4,500 kbps | Twitch |
| Fast gameplay with a stable upload and capable encoder | 1920 × 1080, 60 fps | 6,000 kbps | Twitch |
Alongside these values, Twitch recommends CBR and a two-second keyframe interval. CBR keeps the stream around your chosen bitrate, while keyframes help the player start and continue playback. We'll set both in OBS shortly.
For a fast game, try starting at 720p60. You keep smooth motion without moving up to Full HD. If your connection and computer cope well, compare it with 1080p60. Look at camera turns and busy scenes rather than a quiet game menu; that's where the difference becomes easier to see.
For a conversation or a slower game, try 1080p30. This gives frame detail more priority than a high frame rate, which can be useful when viewers need to follow small text on screen.
If you've enabled Enhanced Broadcasting, the setup works differently. OBS can automatically prepare several quality versions for Twitch, all of which leave your computer and use upload capacity together. Follow the Twitch instructions for that connection. The table above covers a single standard H.264 stream.
YouTube Live: match the codec column
On YouTube, pay particular attention to the codec. Its live encoder guidance lists different values for H.264, HEVC and AV1. If you've selected H.264 in OBS and are sending SDR video over RTMP or RTMPS, use this table:
| Mode | YouTube minimum | YouTube recommended bitrate |
|---|---|---|
| 720p30 | 3,000 kbps | 8,000 kbps |
| 720p60 | 3,000 kbps | 8,000 kbps |
| 1080p30 | 5,000 kbps | 14,000 kbps |
| 1080p60 | 6,000 kbps | 17,000 kbps |
Source: YouTube live encoder settings.
The difference from Twitch is substantial: YouTube recommends 17,000 kbps for H.264 at 1080p60. For AV1 and HEVC at the same resolution and frame rate, the recommendation is 12,000 kbps. So when you see advice to use “12,000 for YouTube”, check which codec the author means.
When deciding between the minimum and recommended values, think about your broadcast. A fast game full of small details benefits from more data than a quiet conversation. If your upload cannot sustain the mode you want, start with a lower resolution or frame rate and watch the result in the player. It is easier to find a workable setting this way than to keep struggling with 1080p60.
One other distinction is easy to miss: settings for uploading a finished video to YouTube are different from live broadcast settings. For OBS, use the live encoder table.
Where to change bitrate in OBS
Now put those values into OBS. Stop streaming, open Settings → Output, set Output Mode to Advanced, and open Streaming. This is where you'll find the encoder, rate control and other video output settings.
- Select a video encoder for your chosen codec. For an initial shared H.264 stream, try a supported hardware encoder; use x264 if a suitable hardware option is unavailable.
- Set Rate Control to CBR and enter the video bitrate in kbps. For example, enter
6000, not6. - Use a two-second keyframe interval for a standard H.264 Twitch or YouTube stream.
- Check the audio bitrate for the selected track. Start with AAC at 128 kbps for stereo, as YouTube recommends. This also fits below Twitch's listed AAC maximum of 160 kbps.
- Set the output resolution and frame rate in Settings → Video. Check whether output rescaling is also enabled in the Streaming tab.
If you cannot find a field, the StreamVi guide includes pictures of the OBS settings, with Russian labels. Names and positions may vary slightly in your version. Also watch out for the two similarly named sections: the Streaming tab under Output controls the video, while the separate Stream section selects the service and server receiving it.
Run a representative test
Before inviting viewers, give the new settings a little time to run. Set aside 10–15 minutes to start with: launch your game and turn on the camera, alerts and other elements of your usual scene. If previous broadcasts only started having trouble after half an hour, let this one run longer.
On YouTube, create a separate broadcast with restricted visibility and check who can see it before starting. Twitch has a bandwidth test in Twitch Inspector to help you check the connection. Use a player or recording afterwards to judge the picture itself.
Treat this short broadcast like a rehearsal for your real show:
- Show a difficult sequence: fast camera movement, a fight, rain or dense scenery. Then switch to a scene with small text.
- Open View → Stats in OBS and watch the frame-loss counters. We'll look at what each one means below.
- Check stream health in the platform dashboard and listen to your voice against game audio.
- Watch on another device, preferably on a different network. Watching on your streaming connection also adds traffic.
If you don't like the result, resist changing everything at once. Try lowering the resolution first, for example, then repeat the same sequence in the game. You'll be able to tell whether that change helped. Once you find a combination you like, save it as an OBS profile so you don't have to reconstruct the settings before every show.
Network drops, encoding lag or rendering lag?
Suppose the picture starts stuttering during your test. The player alone won't tell you whether the connection cannot send the stream, the encoder is overloaded, or OBS is struggling to compose the scene. Open Stats and look for the counter that's increasing. This gives you somewhere useful to start instead of changing unrelated settings.
| Increasing OBS counter | What to investigate | First adjustment |
|---|---|---|
| Dropped Frames (Network) | Delivery from your computer to the ingest server | Reduce video bitrate; check Ethernet, competing uploads and another ingest server |
| Skipped Frames (Encoding Lag) | The encoder cannot keep up | Use a lighter encoder preset or reduce output resolution or frame rate |
| Frames Missed (Rendering Lag) | OBS cannot compose frames on the GPU in time | Cap game FPS, reduce game graphics settings and simplify the OBS scene |
For more detail, see the OBS guides to status indicators, connection problems and performance.
If network drops are increasing, start with upload capacity, competing uploads and the ingest server. A lighter encoder preset won't repair that connection. If rendering lag appears during demanding gameplay, try capping the game's frame rate to leave resources available for OBS.
OBS also offers dynamic bitrate adjustment: it reduces bitrate when the network is congested to avoid dropping as many frames. If you've enabled it, a falling bitrate may be the program responding to limited bandwidth. The picture will lose detail, so it is still worth finding out why the connection is slowing down.
Sometimes OBS stays clear while someone in chat says the video keeps buffering. Check whether they can choose a lower quality in the player. Your stream may be leaving your computer successfully, but viewers still have to download it, which can be difficult on a mobile connection. OBS has a separate guide to this kind of buffering.
Choosing a bitrate for multistreaming
If you stream to Twitch and YouTube through StreamVi, start by asking whether one stream will work for both. With standard cloud restreaming, OBS sends video to StreamVi, and the service passes it on. Choose the codec, resolution, frame rate and bitrate with all your destinations in mind.
A shared profile is convenient when you're happy with the result on both platforms. Set it up, open both players and compare the picture. Our multistreaming and OBS guide covers the connection. Your project's restream plan lists the incoming bitrate and simultaneous-channel limits; that page is in Russian.
You might, however, want to keep a more detailed 1080p60 picture for YouTube and prepare a separate 720p60 version for Twitch. StreamVi transcoding lets you change bitrate, resolution and frame rate for the output streams. Configure it separately and check the plan conditions. The linked documentation is in Russian.
The quality of the original OBS stream matters particularly here. If fine detail disappears before the video reaches the service, raising the output bitrate won't bring it back.
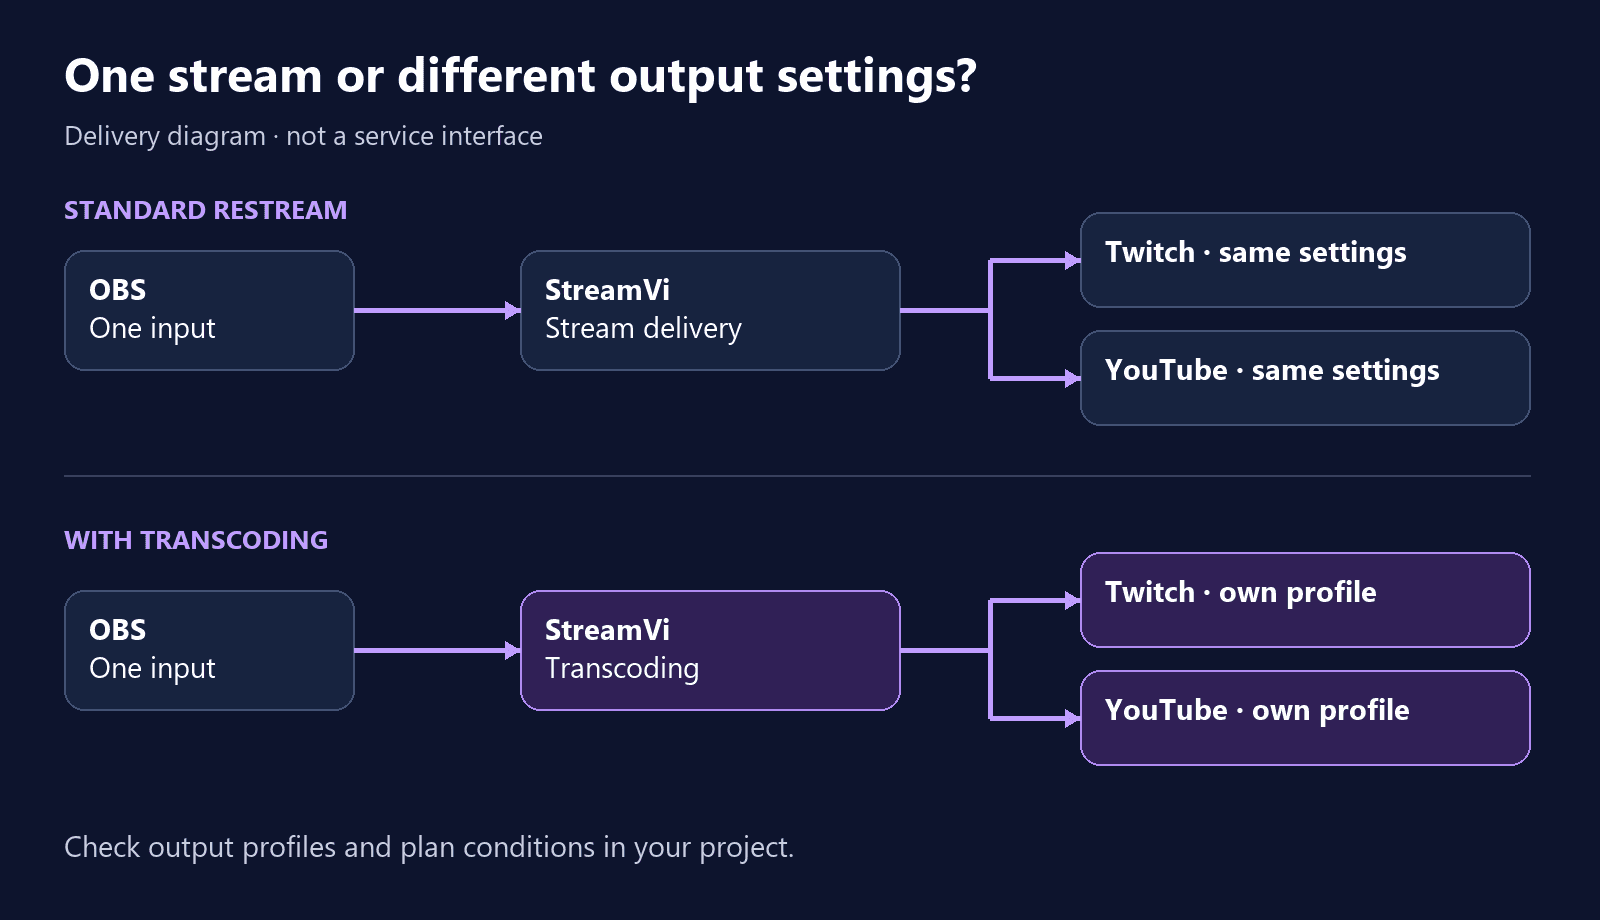
Standard restreaming sends a shared stream to the platforms. Transcoding lets you prepare separate output settings for each one.
For a final check, show the same demanding sequence on both platforms: a drive through a busy street, a fight, or a quick camera turn. Then speak for a while, switch scenes and listen to the audio. Once you're happy, save the complete profile, including the codec, resolution, frame rate and server. Next time, you can get on with the show instead of choosing a bitrate all over again.
