

 Back
 Русский
 Английский
Nov 11, 2026
How to Stream on Xbox Series X|S: Get GTA VI Ready for Twitch, YouTube and VK
Your first evening in GTA VI is a chance to meet the characters, take a wrong turn and let chat talk you into one more mission. It is a frustrating time to discover that viewers can hear the game but not you. Set up the broadcast beforehand so launch night can begin with a quick sound check and the playthrough.
The long-awaited GTA VI arrives on Xbox Series X|S on November 19, 2026. For a first Twitch stream, the console alone is enough. For OBS scenes or viewers waiting on YouTube and VK, use a capture card, a computer and StreamVi. Here is how to prepare either setup.
Start with Twitch or reach several platforms
For a playthrough with Twitch chat, try the Xbox's built-in broadcast. You do not have to buy a capture card for your first stream. If some viewers follow you on YouTube and others on VK Video Live, build the stream in OBS and send it to those destinations through StreamVi.
| Your plan | What you need | Video route |
|---|---|---|
| Go live on Twitch without a computer | Xbox, Twitch account, internet and a headset for commentary | Xbox → Twitch |
| Add custom scenes, a camera and a separate mic | Capture card, computer with OBS and your chosen devices | Xbox → capture card → OBS |
| Stream to YouTube, VK Video Live or several platforms | The OBS setup, connected channels and a suitable StreamVi plan | OBS → StreamVi → destinations |
The direct Twitch broadcast starts from the Xbox guide. In the OBS setup, the computer sends video to StreamVi. Xbox's official walkthrough covers the built-in route.
Stream Xbox to Twitch without a PC
Start with a game you already have installed. Connect your headset and keep a phone nearby so you can check what viewers receive.
- Press the Xbox button on your controller. Open Capture & share → Live streaming in the guide.
- Link the intended Twitch account using the QR code or web address on screen.
- Enter a title for the test. Check your microphone, game volume and broadcast quality. Include party audio if friends are joining.
- Select Go live now and return to the game.
Xbox's guide explains the broadcast controls. Viewers may see a pause screen when you leave the game, so check the stream while gameplay is running.
Open your channel on a phone and speak at your normal commentary volume. Can you hear your voice over the game? Does movement look clear? If the stream stalls, lower the quality and try again. End the test using the Xbox broadcast controls and check that Twitch is offline.
What about YouTube or VK without a capture card?
For YouTube and VK, the rest of this guide uses a capture card, computer and OBS. The built-in method above starts a Twitch broadcast. To share your playthrough on YouTube and VK, prepare the stream on your computer, adding a starting screen, camera and separate microphone if you need them. Set this up before GTA VI launches so you have time to check the picture and sound on every platform. OBS will send the finished feed to StreamVi.
Connect your Xbox to OBS
A capture card brings the console's picture into your computer. OBS is where you add commentary, a camera and your layout, then send the finished stream onward.
Before buying a card, check its capture resolution and frame rate, OBS compatibility and computer requirements. A “4K” label does not always mean it can record in 4K. Check HDR, VRR and high refresh rate support too if you want to keep those features on your gaming display.
For an external USB card with HDMI passthrough, the connections look like this:
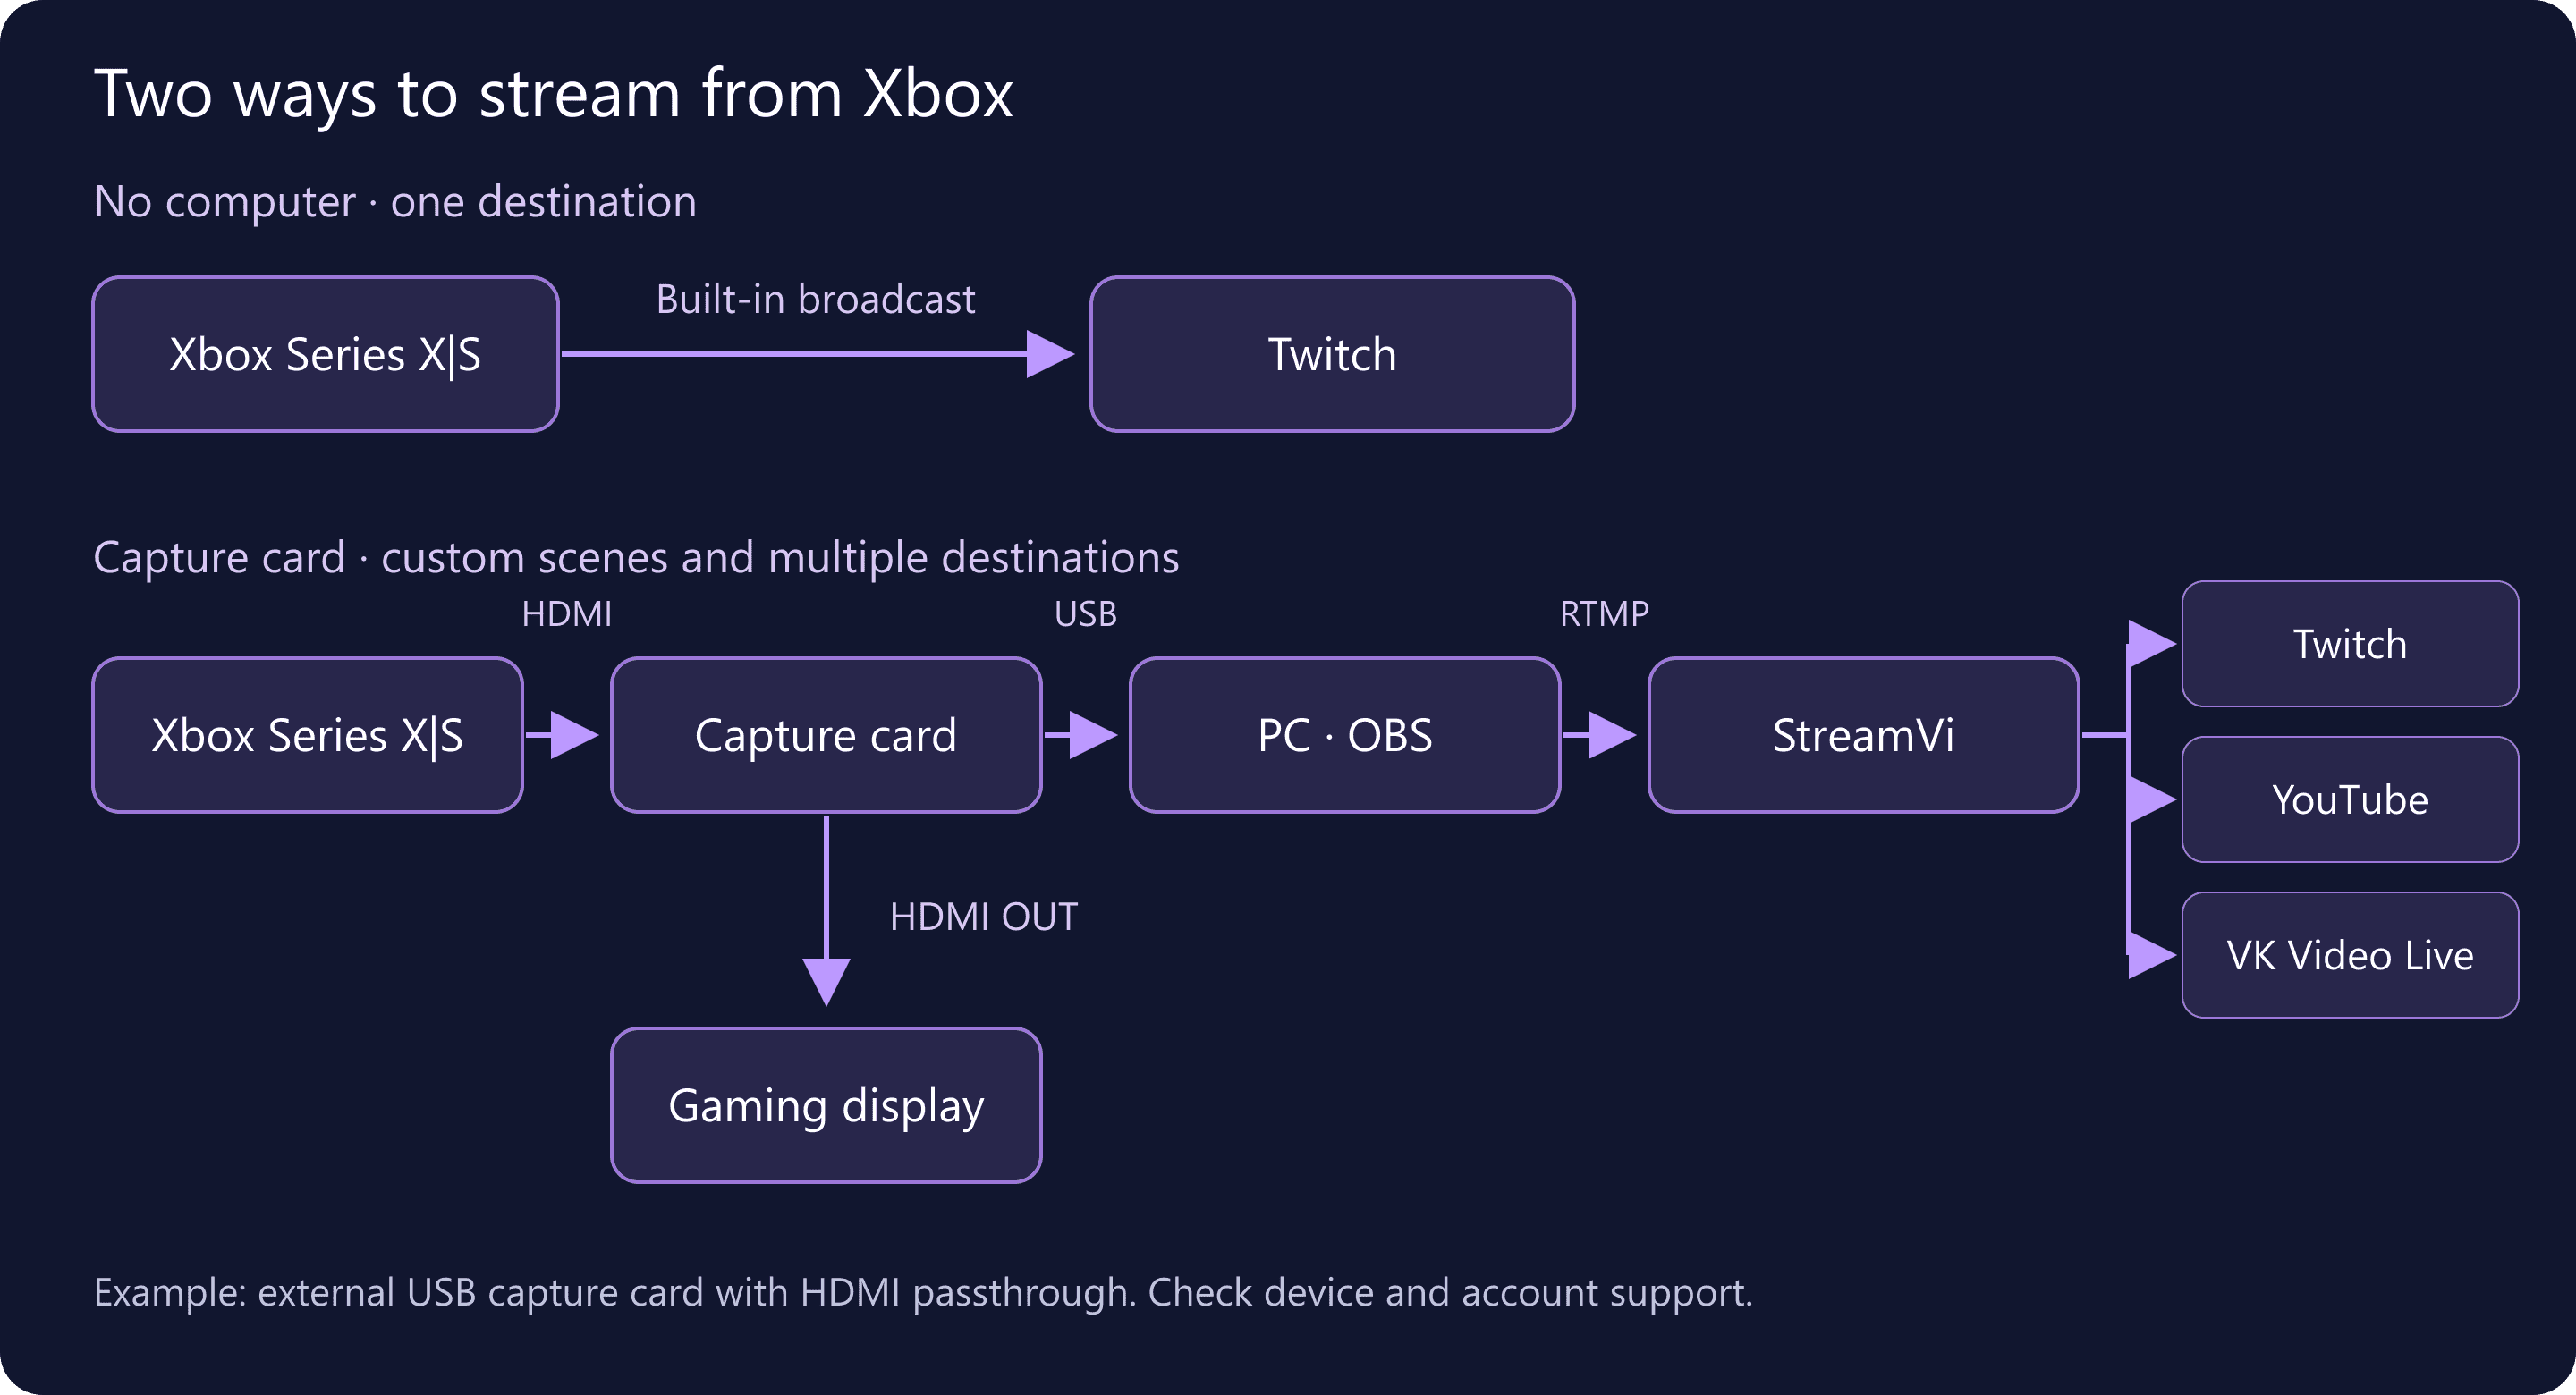
Play on the display connected to the card's HDMI OUT. Use the OBS preview to check framing; it may have a noticeable delay.
- Connect the console's HDMI OUT to the card's HDMI IN.
- Connect the card's HDMI OUT to your TV or monitor, then connect its USB port to a suitable port on the computer.
- Create an “Xbox” scene in OBS, add a Video Capture Device source and select the card. Close other applications using it and choose a supported SDR video mode.
Capture-card manufacturer Elgato shows this wiring in its Xbox Series X|S setup guide for the 4K X. Check USB requirements for your own model. OBS's capture-source guide explains the source settings; names can vary by operating system.
For a black screen, start by connecting Xbox directly to the TV. Then check HDMI IN/OUT, the video mode and the USB cable. The card cannot capture an HDCP-protected signal, so test with gameplay rather than a protected video app.
Stream to Twitch, YouTube and VK through StreamVi
Suppose you want to share GTA VI's first missions with viewers on three platforms. OBS builds the broadcast, and StreamVi takes one feed and sends it to your connected channels. Our multistreaming guide explains the workflow in more detail.
Enable YouTube live streaming early: first-time activation can take up to 24 hours. Check that your StreamVi restream plan supports the simultaneous channels and bitrate you need. The StreamVi guides linked below are in Russian.
Connect your destinations
On your StreamVi project's main page, choose Add channel. Select Twitch and authorize the intended account. Connect YouTube through Google, checking the selected channel if you manage several. This connection does not require you to enter a YouTube key manually. Follow the YouTube connection guide.
For a gaming channel on VK Video Live, select the VK Video Live connection, click Add channel in its window and authorize the intended platform account. The channel should then appear in your project. StreamVi's VK Video Live guide shows the steps.
If viewers expect the stream in a VK community through VK Video / VKontakte, use the separate Vkontakte connection with an account that can manage that community. Follow its own instructions. Check that the destination matches the link you shared with viewers.
Send video from OBS
In StreamVi, open Main → RTMP and Key, choose an ingest server and copy its address and your project key. In OBS, open Settings → Stream, select Custom, and paste those values into Server and Stream Key. The OBS connection to StreamVi uses the StreamVi project key. See the OBS setup guide.
Choose an H.264 encoder your computer supports. Match quality and bitrate to your destinations and upload connection. Our OBS bitrate guide covers a starting point and how to test it. Confirm VK Video Live's ingest settings in your channel studio or through platform support. If destinations need different settings, check StreamVi's separate transcoding feature.
Enable the intended StreamVi channels and start streaming in OBS. Wait for the incoming picture, then open every destination's viewing page. The start/stop guide covers the launch sequence. Read Twitch's simulcasting guidelines before going live on several platforms; keep combined chat on your own working screen for now.
Make sure viewers can see the game and hear you
Make a short OBS recording: play for a moment, talk over the action and let a friend speak in party chat. Listen back with headphones. Your voice should stay easy to follow when the game gets loud.
Connect your commentary microphone to the computer and select it in OBS. A headset mic plugged into the controller does not automatically become an OBS input. Check game audio separately in the capture card's mixer channel. For an echo, mute the viewing page and TV speakers, then check whether the same microphone is being captured twice. OBS explains that duplication problem.
For voices in Xbox Party Chat, open Settings → General → Volume & audio output → Party chat output → Headset & speakers. This also sends party audio over HDMI to the card. Elgato's Xbox chat guide covers the setting and its limit: in-game and lobby chat use a different audio path. Check the connection your headset and card need for those conversations. Let friends know they will be heard on stream.
Once the recording sounds right, watch the live test on a phone. Check Twitch, YouTube and your chosen VK destination in turn. Each should carry both picture and commentary. In YouTube Studio, check that you have selected the intended event. If video is still only in preview, confirm the start with Go live, following YouTube's encoder guide.
An unlisted YouTube event does not make your other destinations private. Set access for each platform beforehand if the rehearsal should not be public.
| Problem | What to check first |
|---|---|
| One channel stays offline | StreamVi channel switch, authorization, selected event and any separate go-live step |
| Viewers hear the game but not you | Selected microphone, mute button and level in the OBS mixer |
| Voice is doubled | Duplicate microphone source, audio monitoring and an unmuted viewing page |
| Recording is smooth but the stream stalls | Upload connection and bitrate; pause background downloads and retry at lower quality |
Change one setting at a time so you can tell what helped. Stop OBS after the rehearsal and check that every destination has ended its broadcast.
Get ready for your first evening in GTA VI
Before release, rehearse with another game using the same scenes, headset and capture card. Save the working settings. When GTA VI launches, run one more capture and audio check in the game itself.
Rockstar has posted its preload announcement. Check installation and updates for your copy ahead of time so your evening does not disappear into a download.
Decide what kind of playthrough you want. Will you take your time exploring Leonida or let chat help choose the route? Use that plan for a clear title, such as “GTA VI on Xbox Series S: First Playthrough, Exploring Leonida.” Use your own console model, then add your language, spoiler policy and channel links to the description.
Choose the rehearsal game's category for the test. Before the real stream, switch it to GTA VI if the category is available. Check audience settings and open every viewing link on a phone. For a scheduled YouTube broadcast, share that event's own URL.
Review the platforms' music rules, too. In-game radio may include tracks that need separate permission to broadcast. Inspect GTA VI's audio options once you can launch it; do not plan around an unconfirmed streamer mode.
Launch-day checklist
- The game starts and your equipment matches the rehearsal setup.
- Titles, descriptions, categories and audience access are checked on every platform.
- The correct Twitch account or StreamVi project is selected, with the intended channels enabled.
- GTA VI appears on stream and your voice is clear over gameplay.
- Twitch, YouTube and VK viewing pages open with working video and audio.
- Chats and moderation are ready, and spare players are muted.
Have chat ready, pick up the controller and discover GTA VI's world with your viewers.
